You can give your Logic Apps access to on-premises SOAP / REST Services through the use of Logic App Custom Connectors and the On-Premises Data Gateway. Being the professional developers that we are, we know that creating reproduceable deployments using ARM templates is also a must. However, simply exporting the template from the Azure Portal requires some tweaks to get everything back in working order.
In this blogpost we will go over what fixes need to be done to your ARM template to get a working Custom Connector, for both SOAP and REST services, through the On-Premises Data Gateway after deployment.
Fixing the Template
What is in the template?
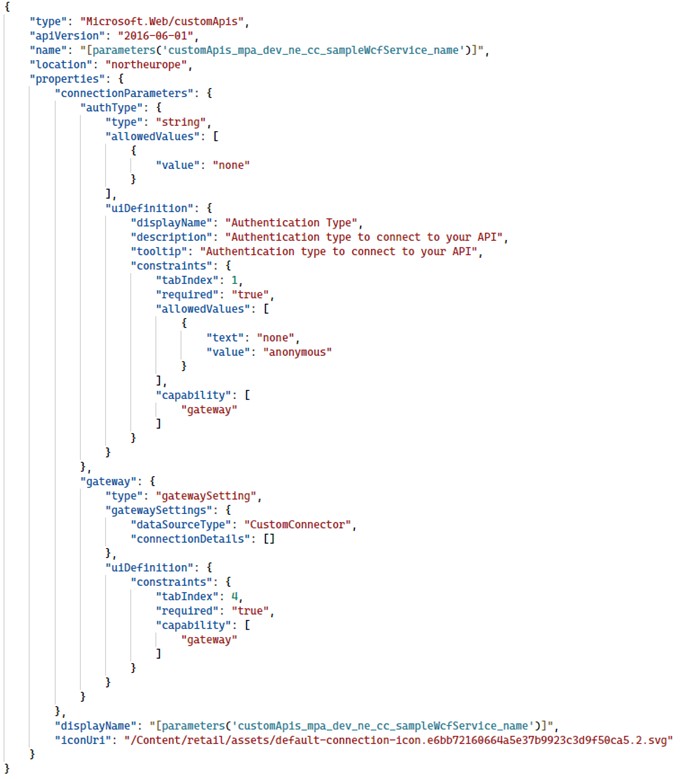
Looking at the initial template that you can export from the Azure Portal, you will see that it only contains some basic resource information. It contains some connection parameters, the display name and any icon you might have set. But it does not specify any details like the backend URL, nor the operations that are defined in the Custom Connector.

Trying to deploy this template will end up in error, complaining about missing properties, these are the ones we will be fixing in the steps outlined below.
Defining the operations
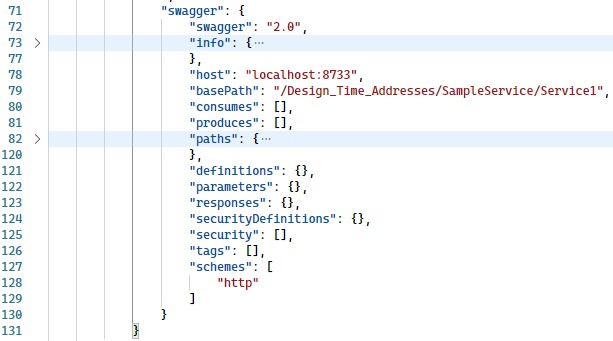
As you can see all the operations that are normally defined in the Definition tab of the Custom Connector are not present. These can be automatically imported by adding the swagger definition in the properties.
In here you need to add a Swagger 2.0 definition, the easiest way to retrieve this is by clicking on the “Download” button on the Overview page of your custom connector.

The downloaded file will contain the swagger definition of the Custom Connector and needs to be pasted inside the swagger property:

Alternatively, if you want to take the long way round, you can open the Swagger Editor of your Custom Connector, this will give you the swagger definition file in YAML, which you can then convert to JSON using the online Swagger Editor.

Adding the Backend Service
We also need to define the backend service; this will tell our Custom Connector where were connecting to.
This is achieved by adding the backendService property to our resource definition:
“backendService”: {
“serviceUrl”: “http://localhost:8733/Design_Time_Addresses/SampleService/Service1”
}
If you’re using SOAP To REST only set the host part of your serviceUrl:
“backendService”: {
“serviceUrl”: “http://localhost:8733/”
}
The ARM template will successfully deploy now, but still does not contain any information whatsoever on the actual service.
On-Premises capabilities
While the connector looks good at first glance, on crucial part is missing, it is not connecting to the On-Premises Data Gateway yet.
The gateway capability is already added to the connectionParameters for the UI, but still needs to be added to the properties of the connector as well. This is simply done by adding “gateway” to the capabilities array:
“capabilities”: [ “gateway” ]
Setting the API Type (SOAP Services)
If you are trying to connect to a SOAP service, the connector is set to REST by default, this can be changed by adding the apiType property to the definition:
“apiType”: “Soap”
If you like being explicit you can set this to “Rest” to indicate you’re using a REST service.
Setting the WSDL Definition (SOAP Services)
If you try deploying after setting the apiType to SOAP you will encounter the next error. Now ARM requires you to specify the wsdlDefinition. Depending on your scenario you must specify if the connector is SOAP to REST or SOAP Passthrough.
SOAP PassThrough
Defining your service as SOAP PassThrough is the easiest configuration, simply adding the wsdlDefinition with an importMethod set to “SoapPassThrough” is sufficient:
“wsdlDefinition”: {
“importMethod”: “SoapPassThrough”
}
SOAP to REST
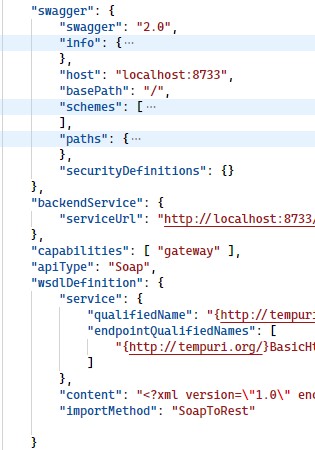
If you want to use SOAP to REST the configuration is a bit more complicated compared to SOAP PassThrough, the importMethod is now set to “SoapToRest” instead, but also requires a service object and a content.
“wsdlDefinition”: {
“service”: {
“qualifiedName”: “{http://tempuri.org/}Service1”,
“endpointQualifiedNames”: [
“{http://tempuri.org/}BasicHttpBinding_IService1”
]
},
“content”: “TRUNCATED”,
“importMethod”: “SoapToRest”
}
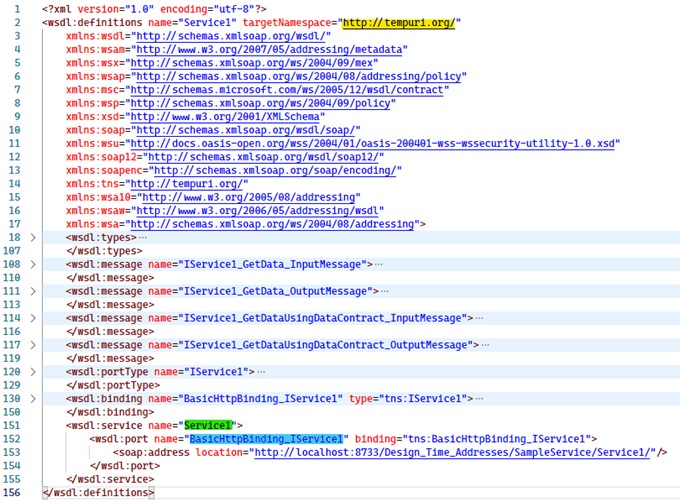
The trickiest part is the “service”-property, the qualifiedName is a combination of the targetNamespace of your WSDL and the name of your Service, and the endpointQualifiedNames is an array consisting out of combinations of your targetNamespace + port names. These combinations are indicated by the color combinations below:


The “content”-property should be set to the XML content of your WSDL file (JSON Escaped). You can also upload the WSDL file to a public location and refer to it in the “url”-property instead.
Closing Remarks
After expanding our ARM template with the required properties for the desired scenario we have a working deployment.

The most important thing to note is that if you want to work in an environment agnostic way, additional updates are needed to the template file, and URLs should be parameterized. However, that is for another blogpost.
If you want to find out more about the future of BizTalk and LogicApps, I’m hosting a webinar on the topic. Tune in and discover how what’s next for Microsoft’s BizTalk Server, what options are available to you, and how you can start planning the roadmap to the future for your integration solution. Click here to find out more.
Subscribe to our RSS feed