Setting up communication with a web service can always turn out to be a bit tricky. You need to take care of configuring the certificate-settings, if required, configure the bindings to use the correct protocol, security and so on. But once all of these settings are correct and you start testing, now and again, depending on the scenario, you might notice you are losing some useful data across two-way communication, since some of the data which was available in the request, no longer appears to be in the response.
In such a case, one could opt to use an orchestration, although this is not the best solution, performance-wise.
An alternative way of storing those values is by creating a static class which will be storing the data based on the Interchange ID of the message. Since this static class needs to be told what data it needs to track, 2 custom pipeline components are needed. Why 2 components? You’ll need one to pass on the data from the message into the static class and another to retrieve those values from the class and pass them back onto the response message.
Yes, this can also be done by merging the components into a single one and using a property to indicate the direction, but for the sake of this post we will be using 2 separate components, just to keep everything clear.
Imagine a large system, such as AX, which is containing a whole bunch of data about several orders, but needs to retrieve some additional information – from another system – before processing these orders. Since these requests could be working asynchronously, in the AX point-of-view, the source-system will need some kind of ID to match the response to the initial request. In this case the request that is being sent towards BizTalk will be containing an orderID or requestID or any other form of identification, just to make sure each response is matched to the correct request.
Okay, so now this request, containing the ID, has arrived in BizTalk, but since the destination-system has no need for any ID from an external system, no xml-node will be provided for this ID, nor will it be returned within the response. In such a situation this issue becomes a “BizTalk-problem” to be resolved by the integration developer/architect.
This is when the use of the aforementioned static class comes in handy. Since the actual call to the destination-system is a synchronous action and there is no need for an orchestration to perform any additional actions, we can simply use the custom pipeline components to store/retrieve the original ID, assigned by the source-system.
The custom pipeline components
The static class might look as the example below, which allows BizTalk to save a complete list of context-properties for a specific interchangeID.
Next, you’ll be needing the pipeline components to actually access this class and allow for the data to be saved and restored when needed.
This post will not be zooming into the code of these pipeline components, but below is the general explanation of what these components are supposed to do.
SaveContextOverCallRequest
The first custom pipeline component will retrieve the InterchangeID from the context of the incoming message and use this as a unique ID to save a specified list of properties to the static class. This list could be scaled down by setting a specific namespace, which can be used to filter the available context properties. This would make sure only the properties from the specified namespace are being saved, preventing an overload of data being stored in memory.
SaveContextOverCallResponse
The second custom pipeline component will again retrieve the InterchangeID from the context of the incoming message, but this time it will use this value to retrieve the list of context-properties from the static class. Once the properties have been collected, there is no need for the static class to keep track of these values any longer, therefore it can remove these from its dictionary.
Next, you’ll be needing the pipeline components to actually access this class and allow for the data to be saved and restored once needed.
This post will not be zooming into the code of these pipeline components, but below is the general explanation of what these components are supposed to do.
Using the component
Once these components have been created, they will have to be added to the send/receive pipeline, depending on the type of component.
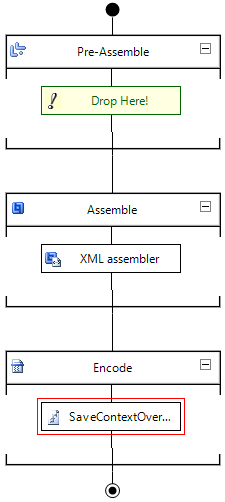
The send pipeline will contain the ‘SaveContextOverCallRequest’-component to make sure the required properties are being saved. The custom pipeline component should be the last component of this pipeline, since you want to make sure all of the property promotion is finished before the properties are being saved into the static class.

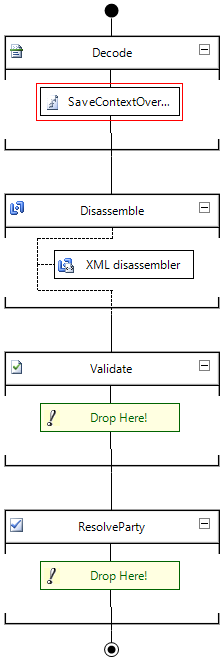
The receive pipeline will contain the ‘SaveContextOverCallResponse’-component, as this will be restoring the saved properties to the context. This should also be the first component in this pipeline, because we want the saved properties to be returned to the context of the message as soon as possible, to make sure these values are accessible for any further processing. Be aware that whether or not you are able to put this first, will laregely depend on your situation and transport protocol.

Example
To show the functionality of these components, a simple test-case has been set up, in which a request-message is being picked up from a file-location, a connection is made with a service and the response is sent back to a different folder. To give you an idea of the complete flow, the tracking data has been added here.
![]()
The request that will be used in this sample is a pretty simple xml-message, which can be seen below:
| <ns0:GetData xmlns:ns0=”http://Codit.Blog.Stub”> <ns0:request> <ns0:RequestDate>2016-06-15</ns0:RequestDate> <ns0:RequestNumber>0002</ns0:RequestNumber> <ns0:CustomerID>0001</ns0:CustomerID> <ns0:Value>Codit offices</ns0:Value> </ns0:request> </ns0:GetData> |
As you can see, this request contains both a request- and customer-ID, which are the two ‘important’ values in this test-case. To make sure these properties are available in the context of the message, we made sure these are being promoted by the XML Disassembler, since the fields are indicated as promoted in the schema. Once the flow is triggered, we can have a look at the context properties and notice that the 2 values have been promoted.

The initial raw response that comes back from the service, which is the message before any pipeline processing has been performed, no longer contains these context-properties and neither does it contain these values in the body.

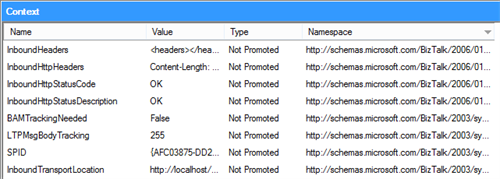
However, if we have another look at the context properties after the receive pipeline has done its job, we notice the properties are back in place and can be used for further processing/routing/….

Conclusion
Whenever you need to save a couple of values cross-call, there is an alternative solution to building an orchestration to keep track of these values.
Whenever you are building a flow, which will be saving a huge amount of data, you could of course build a solution which saves this data to disk/SQL/…, but that is all up to you.
Subscribe to our RSS feed