Introduction
Managed Identity is a feature in Azure that simplifies the process of authenticating and authorizing applications with Azure resources.
When working with Azure Functions, Managed Identity helps securely connect your functions to other Azure services without the need to manage credentials explicitly. This guide will walk you through the setup and usage of Managed Identity for Azure Functions, enhancing security and simplifying the management of secrets.
What is Managed Identity?
This is a method for a service principal assigned to an Azure resource to allow the resource to communicate with other resources without the need for credentials. This approach enhances security by eliminating the necessity to deploy usernames or passwords in plain text, thus reducing the risk of attacks from malicious actors.
Types of Managed Identity
System-Assigned Managed Identity
This type of identity is created and managed by Azure for a specific Azure resource (e.g. Azure Functions) and is tightly coupled to the lifecycle of the service instance. The identity is created when the Managed Identity is assigned and enabled, and it ends when the resource is removed or deleted.
User-Assigned Managed Identity
This type of identity can be created and managed separately, allowing you to attach it to multiple Azure resources. For example, if multiple resources need to connect to a Key Vault resource, you can create a user-assigned Managed Identity and assign it to all the resources that need to communicate with the Key Vault. This approach simplifies permissions management and makes it easier to handle access control across multiple resources.
Setting Up Managed Identity for Azure Functions
Azure Active Directory – App Registration
An application registration is required for the authentication setup between your Azure resource and the authentication platform. This ensures that only Azure resources connected to this application registration are allowed to communicate with the Azure resource, such as an Azure Function. Anyone without the provided token will not be permitted to access the Azure resource.
Create your app registration

Creating the client secret and exposing to an API
The requirements for the authentication setup in the Azure Functions settings are:
- Application ID
- Client Secret
It is best practice to store the client secret in a Key Vault and reference it as an environment variable. This approach ensures security and ease of management. You will need to assign the client secret to the environment variable required by the authentication setup, which will become evident further on.

Navigate to Your App Registration
- On the left-hand side, click on “Certificates & Secrets” and create a new secret. Make sure to save your secret temporarily, as you can only view it once. However, you can always create a new secret if you don’t save it or lose it for any reason.
Expose an API
- Navigate to the left-hand side and select “Expose an API.”
- Click on “Add Scope.”
- A window pops up on the right-hand side. Click on “Save and Continue.”
- A secondary window pops up. Insert the
user_impersonationscope as shown in the screenshot below.

With the setup created above, we have now generated our endpoint that will connect seamlessly with the identity provider requirements in the Authentication section of the function resource.
Enabling Authentication on the Azure Function
Navigate to your function and click on Authentication, located on the left hand side of the menu under settings
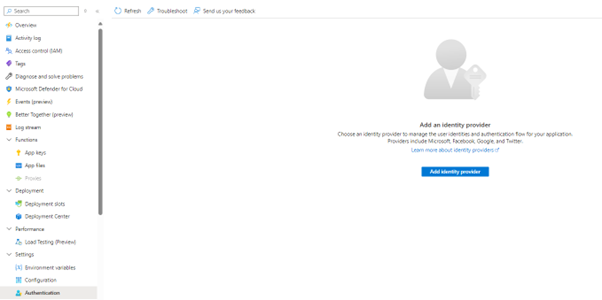
Click on Add Identity provider – in the next step, from the dropdown box, select “Microsoft”.
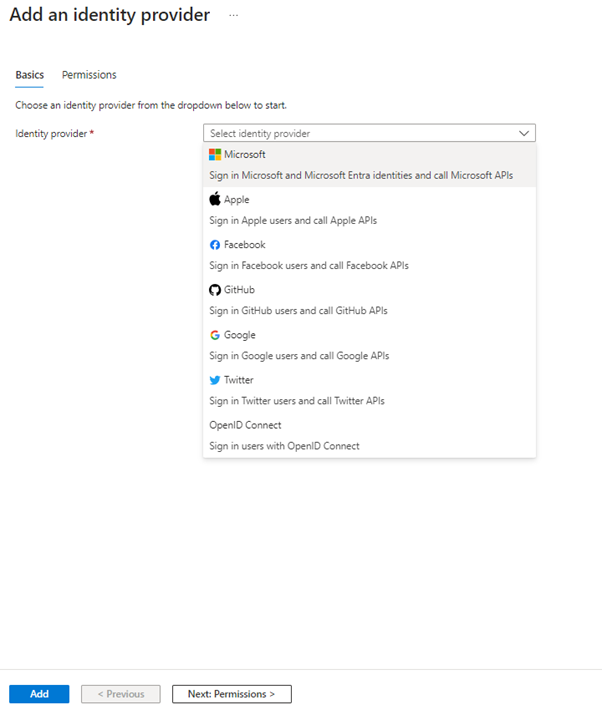
Click on Add, once you click on Add the below form is provided.
In the first part option, leave Workforce configuration selected, as we would want to only authorize with our current tenant.

For the App Registration, we will make use of the registration we have created previously. Select “Pick an existing app registration in this directory” and from the dropdown box select your newly created app registration.
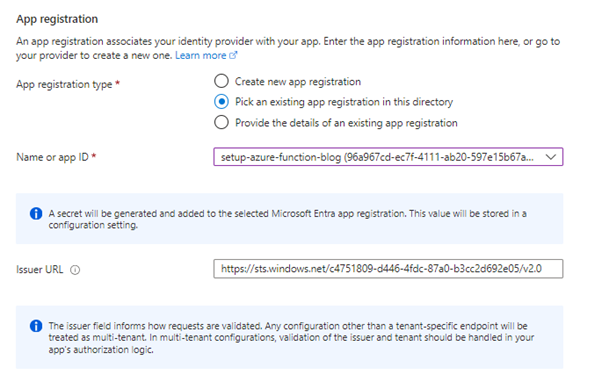
The Issuer URL has now been created for you, including the tenant ID as part of the URL and using the V2.0 endpoint for the issuer to validate the bearer token that will be provided as part of the header within the request.
In the final part, we will set up the additional checks.
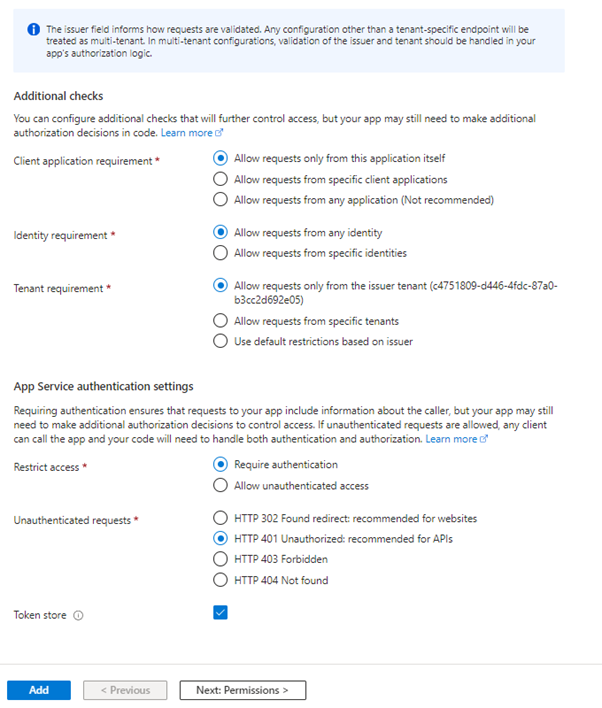
1. Client Application Requirement
This setting controls which client applications are allowed to make requests to your Azure Function or Web App. The “client application” refers to the application making the API calls.
- Allow requests only from this application itself: This option restricts access to requests that originate from the same application. This is useful when you want to ensure that only the app you are configuring can interact with itself, enhancing security by preventing other apps from making unauthorized requests.
- Allow requests from specific client applications: This allows you to specify a list of client applications that are permitted to make requests to your app. This is useful in scenarios where you have multiple applications, and you want to allow access only to certain trusted ones.
- Allow requests from any application (not recommended): This option allows requests from any client application. While it provides maximum accessibility, it is generally not recommended because it can expose your app to potential security risks, as any client can attempt to interact with it.
2. Identity Requirement
This setting determines which user identities can make requests to your app.
- Allow requests from any identity: This option allows requests from any authenticated user, regardless of their identity. This is the most permissive setting and can be used in scenarios where broad access is required.
- Allow requests from specific identities: This option restricts access to requests from specific user identities. It is useful when you need to control access at a finer level, allowing only certain users or groups to interact with your app.
3. Tenant Requirement
This setting controls which tenants can make requests to your app. In Azure Active Directory (AAD), a tenant is a dedicated instance of AAD that an organization receives when they sign up for a Microsoft cloud service.
- Allow requests only from the issuer tenant: This option restricts access to requests originating from the specified tenant. For example, if your organization’s AAD tenant ID is specified here, only users and applications from your organization can access the app.
- Allow requests from specific tenants: This allows you to specify multiple tenants that can access your app. This is useful in scenarios where your app serves multiple organizations, and you need to restrict access to those specific organizations.
- Use default restrictions based on issuer: This option applies the default restrictions based on the issuer of the token. It is a more generalized setting that leverages the built-in rules of the authentication provider.
Why These Checks Matter
Implementing these additional checks is crucial for securing your Azure Function or Web App. They provide several benefits:
- Enhanced Security: By restricting which clients, identities, and tenants can access your app, you reduce the risk of unauthorized access and potential security breaches.
- Granular Access Control: These settings allow you to fine-tune who can interact with your app, giving you control over access at various levels.
- Compliance: For applications dealing with sensitive data, ensuring that only authorized clients and users from specific tenants can access the app helps in complying with regulatory requirements.
By understanding and properly configuring these settings, developers can create a more secure and controlled environment for their applications.
Two things are left to perform:
- Provide the Client Secret: This is the value provided when the app registration was created. An app variable has been created because we selected the app registration above that creates the secret inside the environment variables of the function. For better protection, it is best practice to store the value of the client secret inside Key Vault and reference it in the environment variables.
- Add the Token Audience: This value is crucial for authorization: without it, requests will not be authorized. There seems to be a bug from Microsoft where this value is not automatically populated.

N.B – It may be the case that the audience is not being added by default due to a bug or issue from Microsoft. If the audience is not added, the request will always return an error.
In the highlighted text box, we need to add api://{client-id}. This ensures that only tokens generated from this app registration are allowed. If there are scenarios where tokens generated from other resources need to be allowed, these must be listed in the “Allowed token audiences.”
If you have two Azure Functions that are communicating with each other, and the receiving Azure Function has identity provider enabled, the client requirement needs to be set to “Allow Requests from Specific Client Applications.” You must provide the function ID in the text box that appears. If you have multiple Azure Functions or any other resources, you can provide the IDs separated by a semicolon (;).
It is important to click “Save” once the allowed token audience is added.
If you wish to add the Authentication Identity Provider through a Bicep script, you can use the code below.
Bicep template code to enable Authentication on the Azure Function
The above script describes and implements the authentication settings for the identity provider for the Azure Function. This script is quite flexible and allows you to modify all the settings described in the previous approach.
Interaction between the consumer and the Azure function
In the scenario described below, I will explain how to communicate with the Azure Function, pass the correct authorization header using Managed Identity, and obtain the result from the Azure Function.
This C# program demonstrates how to securely call an Azure Function using an access token retrieved from Azure Key Vault.
It begins by creating a SecretClient to fetch the Application ID secret from Azure Key Vault.
With this ID, the program then requests an OAuth token using DefaultAzureCredential. Using the token, it sets up an HttpClient to make an authenticated request to the Azure Function’s URL. The response is then processed to either display the function’s result or an error message if the call fails.
This approach ensures secure access to the Azure Function by leveraging Azure’s Managed Identity and credential management services.
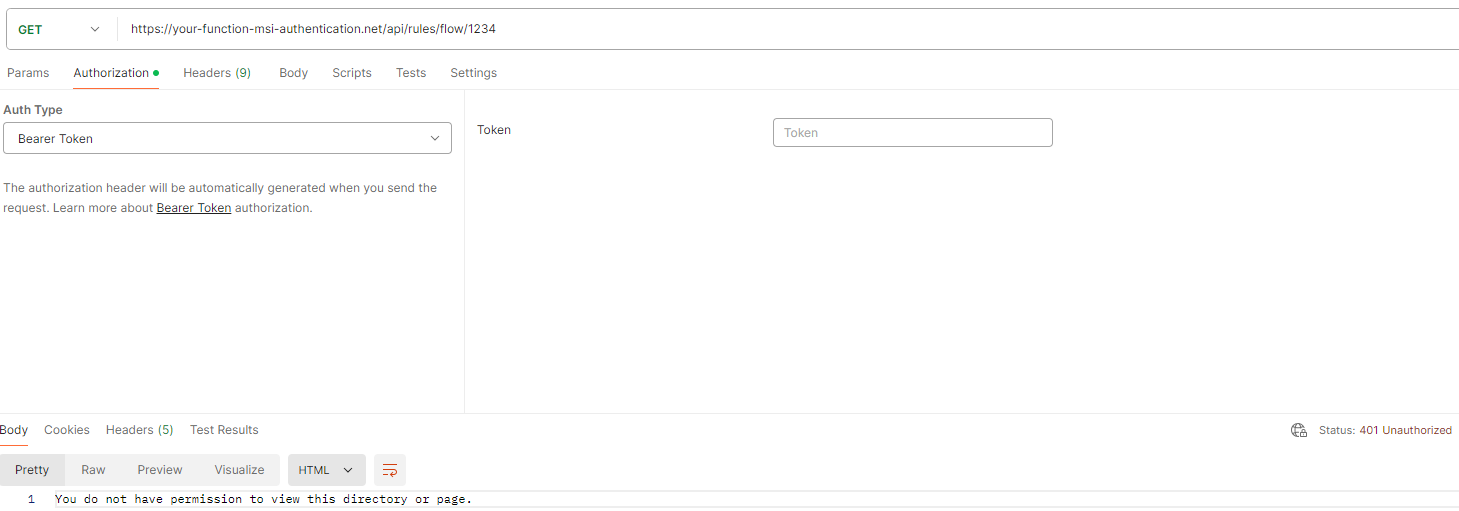
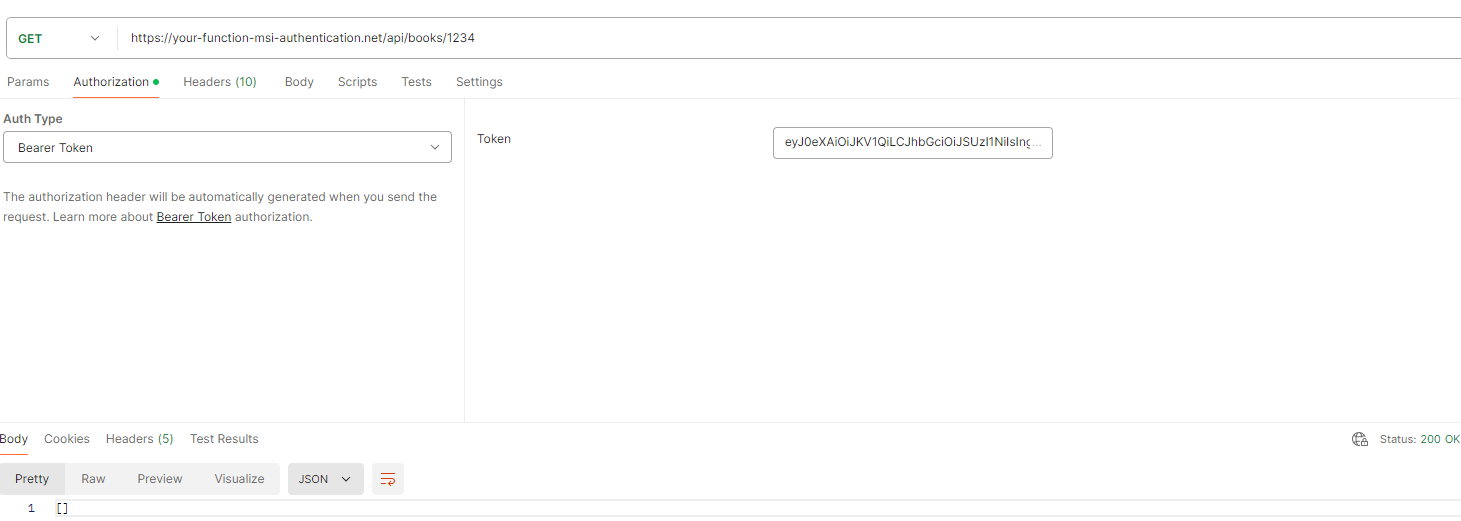
Using postman to call the Azure Function
The screenshot below clearly shows that the request is being made without a token, leading to a 401 error code. This error occurs because the request lacks authorization, which is due to the missing access token in the authorization header.
In the screenshot below, a correctly generated access token from Azure Active Directory is passed. Since the access token is valid, the request is processed, and a result is returned.
For further information on how an access token can be generated via Azure Active Directory registration details, please refer to the relevant documentation or resources, click here.
Conclusion
In conclusion, Managed Identity provides a robust and secure method for authenticating and authorizing Azure Functions to interact with other Azure resources. By eliminating the need for explicit credential management, Managed Identity not only enhances security but also simplifies the development and maintenance of cloud-based applications. Through the setup and configuration of System or User Assigned Managed Identities, along with detailed authentication settings, developers can ensure that their Azure Functions are both secure and compliant with organizational policies. This approach, combined with tools like Key Vault and best practices for managing secrets, forms a comprehensive strategy for securing Azure Functions in any cloud environment.
Subscribe to our RSS feed
Talk to an expert
Contact Michel
He's our Data & App Integration Domain Lead