Diving into integration testing
Integration testing is obviously an essential step when you want to develop stable software. Most of the time you want dive a bit deeper into the testing process and go beyond the happy flow tests and one way to go this is test with API mocking. However, when you cover a wide variety of tests, you will also get a wide variety of responses from your mocked endpoints. I will explain this a bit more as we go along.
General concept

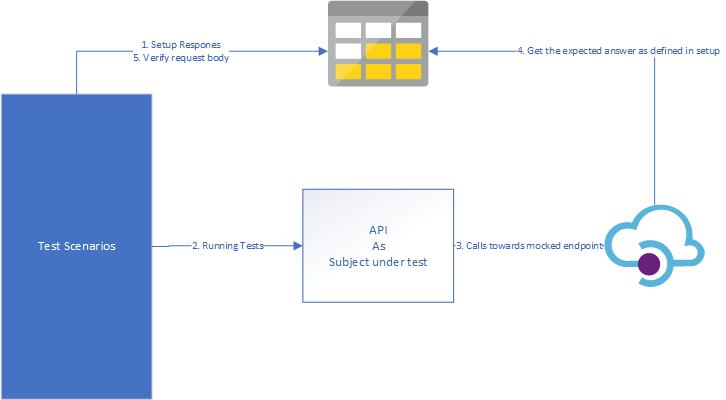
In this demo we will run our tests from our favourite testing framework.
- During setup we will configure our responses in a storage account we expect during our tests.
- While running the test we will call our API which is subject under test(=SUT)
- The SUT will forward the request to the mocked endpoint in API-M
- API-M will fetch the expected response to return and return it to the SUT.
- The test scenario is verified if the request was the request we expected
For uploading and downloading a blob I recommend you to take a look at the Client Library options in Azure Documentation
Link Azure API Management to Blob storage with Managed Identity
If we want to verify the responses of our API we will need to upload blob files. Based on the schema above we see API-M will need to do this.
The way to configure this, is as follows:
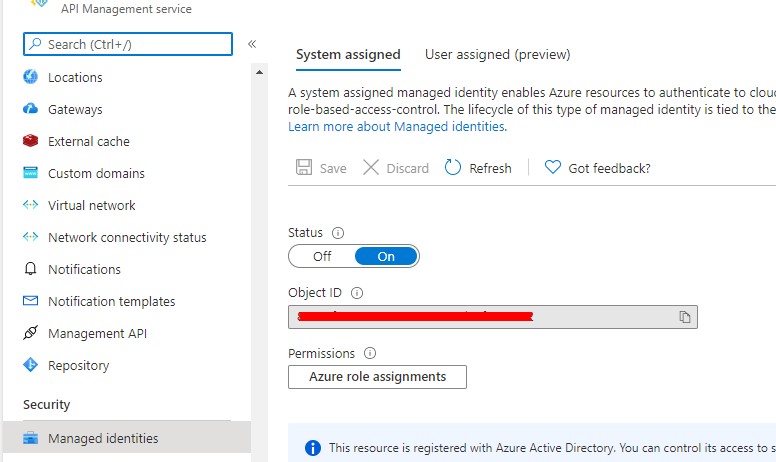
- Go to Azure API Management and enable Managed Identity by turning the status toggle to ‘On’.

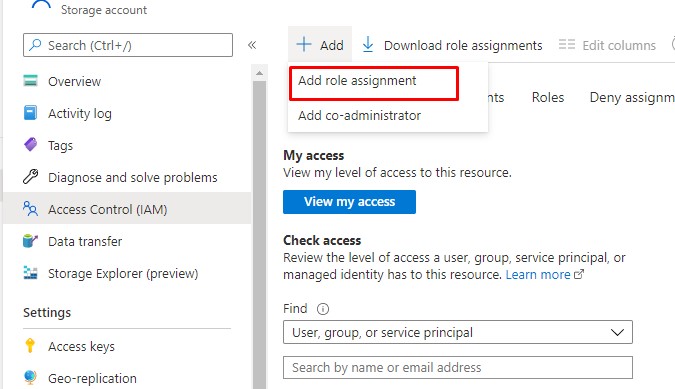
- Go to the storage account where you want to manage your mocks and add a Role assignment

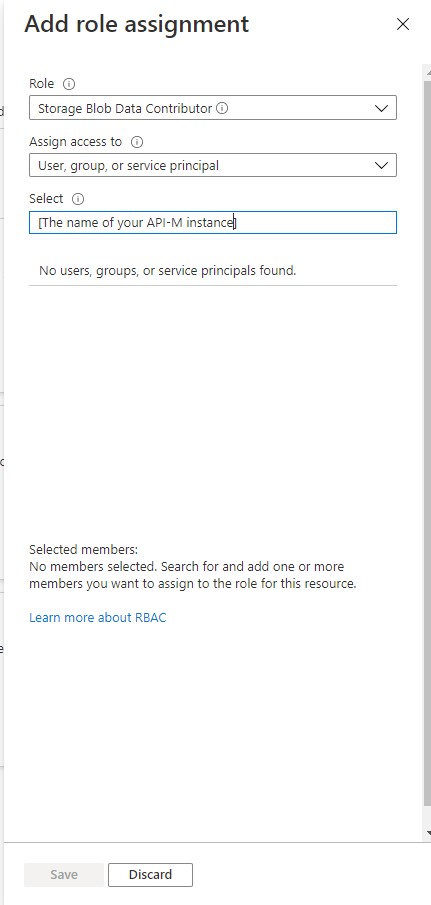
- On the role assignment page select as role ‘Storage Blob Data Contributor’ and select the name of your API-M instance. Confirm by pressing on Save.

Now, Azure API Management will be able to read and write from any resource in your storage containers.
Import API Mocking
Next, we need to import the API we want to mock. You can do this via the various methods. The most easy one, based on an Open-API spec is described in the Azure Docs here
It doesn’t matter if the URL points towards the real API. That is something we will modify in the next step.
Response Mocking
Depending on the storage account container we use to set up the public access role, we do not need to authenticate. Instead we can go directly to the URL.
So the easy way to configure this is to go to the API in Azure API Management and set the backend service URL to the storage container you want to fetch the results from, and to rewrite the URL to the blob file you uploaded – or will upload – for that operation.
A sample inbound section for the policy will look like this:
“`xml
Request verification
Unfortunately, request verification is not as easy as response mocking. When a request comes in, we will upload the file to Azure Storage inside our Azure API-M Operation policy, but for create/update operations it is required to authenticate this in Azure Storage. We do not need to enter a ClientID and ClientSecret as it is done via Managed Identity, but nevertheless the policy will be a little bit more complex.
Here is an example inbound section for a policy to upload the request:
Link it all together
We now have our mocked API, we have our response mocking and request logging. The only left to do is some plumbing in your testing framework of your choice.
As a last tip: If you don’t have a specific environment for your integration and load testing, make sure you revert the modifications to the API, so that you use the real dependencies if you are not running your tests.
I hope this article was helpful for you.
Happy testing!
Gillian
Subscribe to our RSS feed